Adding Income in BharatBills Using a GST Invoice Generator
Managing finances is a crucial aspect of any business, and accurate invoicing is a significant part of this process. In India, GST compliance adds a layer of complexity. This is where a GST invoice generator becomes invaluable, especially when using a platform like BharatBills. Here’s a comprehensive guide on how to add income using a GST invoice generator in BharatBills.
Why Use a GST Invoice Generator
For businesses in India, adhering to GST regulations is essential. A GST invoice generator simplifies the process by automating invoice creation, ensuring compliance, and reducing errors. BharatBills, a popular billing software, integrates these features, making it easier for businesses to manage their finances efficiently.
Step-by-Step Guide to Adding Income in BharatBills
Step 1: Log In to BharatBills
- Visit the BharatBills website and log in to your account using your credentials.
- If you don’t have an account, you’ll need to sign up and set up your business profile.
Step 2: Navigate to the Invoicing Section
- Once logged in, go to the “Invoicing” section from the main dashboard.
- Select “Create New Invoice” to start generating a GST-compliant invoice.
Step 3: Input Client Details
- Enter the client’s information, including their GSTIN, address, and contact details.
- Ensure that all details are accurate to avoid any compliance issues.
Steps to Add Income in Bharatbiils
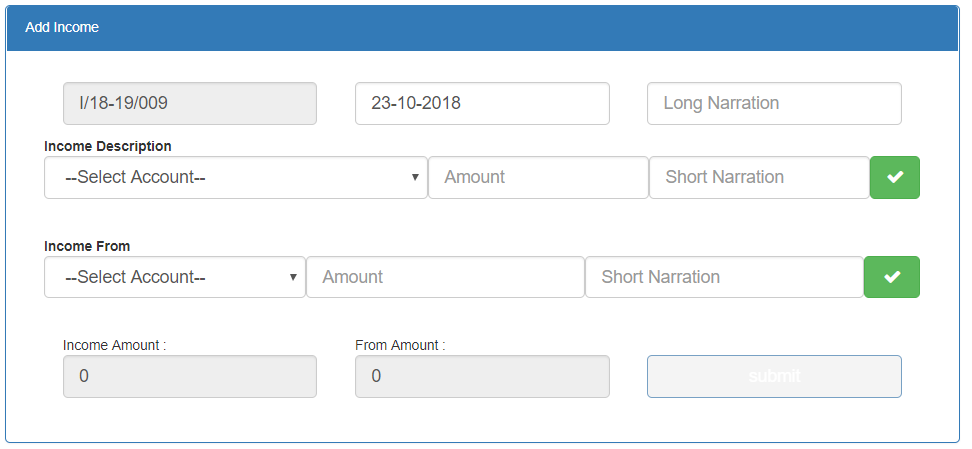
- Click on Income/Expense -> Add Income

Add Income
- Income document have the system generated unique transaction number
- Select Transaction Date
- Enter the long Narration about this document
- Input the description of the goods or services provided.
- Specify the quantity and rate. The GST invoice generator will automatically calculate the GST and add it to the invoice total.
- Income Description
- Select Income description or income account (Income in )
- Enter Income Amount
- Write short narration
- Click on green button
- You can add number of income description
- Income From
- Select Income source
- Select income amount
- write short narration about income source and click on green button
- you can add number of income from
Click on Submit
Benefits of Using BharatBills with a GST Invoice Generator
Compliance: Ensures all invoices are GST-compliant, reducing the risk of penalties with a GST invoice generator.
Accuracy: Automated calculations by the GST invoice generator reduce errors, ensuring precise invoicing.
Efficiency: The GST invoice generator streamlines the invoicing process, saving time and effort.
Real-Time Tracking: Provides real-time updates on income and GST collections through the GST invoice generator.
Conclusion
Using a GST invoice generator in BharatBills is a smart move for businesses to streamline financial processes and comply with GST regulations. This GST invoice generator simplifies invoicing, ensuring accuracy and efficiency, and allowing businesses to focus on growth. By following the steps above, you can easily add income in BharatBills with a GST invoice generator, keeping your financial records accurate and compliant. The GST invoice generator automates the process, reducing errors and saving time. Embrace a GST invoice generator to enhance your business operations and financial management.
I hope this blog serves your needs! Let me know if you need any changes or additional details.
More useful Link
- How to Add Expense Account in BharatBills
- How to Add Expenses in BharatBills
- How to View/Delete Expense/Income Voucher
- How to Add Check RCM Invoice BharatBills
